Tuesday, December 18, 2012

DIY Project - Hope Chest

This weekend I scored a great hope chest from Carroll Creek Antiques, Etc. in Frederick, MD for only $42.  I knew the chest would need some work, so after purchasing the chest I headed to the Home Depot to pick up some supplies.  I picked up a sanding sponge for $3, contact paper for $7 and clear gloss lacquer spray for $5.


Outside:  Before
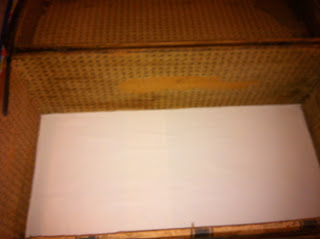
 Inside:  Before


I started by cleaning the inside and outside of the chest with mild soap and water.  I highly suggest this for anything you pick up at an antique store because you never know how long it's been on display in the store and you never know how long it was sitting in an attic or basement before that.


Starting to clean with mild soap and water


You can see how dirty it was!  I made sure to lay down a towel before starting the cleaning process.


Halfway there!


Once I finished cleaning it up, I sanded all of the wood and pulled off as much of the paper from the inside of the chest as I could.  I also sanded a few rust spots off of the metal parts.

Next I started to measure and cut the contact paper to put inside of the chest.  


Then I placed the contact paper into the chest and smoothed it out with a piece of thick paper.


Finished bottom


Then I started to paper the walls and edges


After that was completed, I began on the top.  At the end, I went back and filled in all of the edges and spots that I missed.


Next, it was time to spray it with the Rust-Oleum clear gloss spray lacquer.  I sprayed one coat and let it dry overnight.  Then I sprayed another coat and let it dry over the next day.  It was very easy to do, I just followed the directions on the can, which were to spray evenly over the product (wood, metal, etc.) and then let it dry for a full 24 hours.  It suggests using at least two coats.  


And... here's the final product!  It's now ready for all of my wedding keepsakes!  


Inside Before                                                                             Inside After


Outside Before                                                                         Outside After

Antiquing in Frederick, MD

With our wedding coming up, I've been on the lookout for a hope chest to store all of the keepsakes from the wedding and our first year of marriage.  I've looked around online and just couldn't seem to find exactly what I was looking for.   I've also been looking online for a recipe card holder for my Michigan bridal shower and could only find one that I sort of liked at the Container Store. 

Since I didn't have any plans this Sunday, I decided to take my quest for a hope chest and recipe box on the road, to the antique stores in downtown Frederick, MD.   

Kevin and I have taken a road trip to Frederick, MD in the past and enjoyed spending time walking around downtown and stopping into a few stores, but since Kevin was with me and hates shopping, I didn't get to spend as much time antiquing as I would have liked.  This time I had a plan.  We'd get some lunch together downtown and then go our separate ways for the afternoon.  Me, to the antique stores, and Kevin to the Monocacy National Battlefield and Civil War Museum. (Nerd.)

Frederick has TONS of great antique stores with a variety of items and prices.  I stopped into a few, but could not seem to find the two items I was looking for.  Finally, I stumbled upon Carroll Creek Antiques on E. Patrick Street and found the perfect hope chest!


(Stay tuned for my next blog post on how I turned this hope chest into what it looks like today!)


After purchasing the chest, I set out again to find the perfect box to hold the recipe cards that I requested that ladies fill out and bring to my Michigan bridal shower.  I went into what seemed like 10 stores and could not seem to find anything that would work.  Either they were too short, too small or too big. 

I tried one last store-  Emporium Antiques.  Emporium Antiques is a large storefront that has around 130 individually owned booths inside the store.  Each booth specializes in different antiques including silverware, jewelry, magazines, furniture, toys, clothes, woodworking, etc.   I searched the entire store for the perfect container and found a lot that would work, but were just too expensive.  Prices ranged from $50-$200 for a simple storage box.  Finally I found two that would work and that were in my price range.  I settled on this small wooden box for only $14! 


After cleaning it up with soap and water at home, it was the perfect container to hold my recipe cards.  (Thanks again to Jessica and Sarah at Empress Stationery for creating my beautiful invitations and recipe cards!)


Shout out to Empress Stationery--  they did a magnificent job!


Stay tuned for my tutorial on how I turned my hope chest from dusty and rusty to just like new! 

Monday, December 17, 2012

Anniversary Dinner at BlackSalt

For our last dating anniversary Kevin and I decided to celebrate these past three years with a fabulous dinner at BlackSalt.


When deciding where we wanted to eat, we knew that we wanted to do a Chef's tasting menu, but we didn't know where we wanted to go.  I requested seafood, so Kevin starting researching some restaurants and finally settled on BlackSalt.

BlackSalt is a restaurant and a fish market.  The market is in the front of the building and carries fresh fish, seafood, caviar and some prepared dishes such as crab cakes, seafood spreads and chowders.


We had already decided on the seven course Chef's Tasting Menu with wine pairings, but thought it was very cool to learn that if we decided to choose dishes off the menu, that we also had the option to pick out items from the fish market and have the Chef prepare them. BlackSalt had so many choices that made each person's dining experience unique. 

When choosing the tasting menu, the waitress asked if we had any food allergies or specific dishes that we'd like to stay away from.  She also asked us if there was anything on the menu that we'd like to try in particular.  We told her that the sky was the limit and that we were up for anything, but that we'd really like to try the Atlantic Day Boat scallops.

It took a moment for the Chef to prepare a menu for us, so the waitress started us off with an assortment of bread and olive oil mixed with spices and two glasses of champagne.  The first course was a British Columbia oyster topped with wild Hackleback caviar and it was served in a chilled martini glass.  It was delicious, and the wine pairing was perfect.  (Note:  the wine pairings were almost full glasses, so details of which specific wines were in the pairings are a bit hazy...)

Our second course was a very lightly seared Hamachi with a chili vinaigrette and thinly sliced radishes.  The Hamachi was light and airy, and the radishes added a wonderful crunch.  This wine pairing was a little too buttery for my taste, so Kevin was more than happy to drink both his and mine.  :)

The third course was not listed on the menu and were were told by the waitress that "this is Chef's favorite dish and the dish he makes for himself."  She had told the Chef that we were very adventurous eaters and that the sky was the limit, so he wanted us to try this dish.  It was a monk fish collarbone in a soy sauce butter reduction with a kimchi salad and shiitake mushrooms.  It was TO DIE FOR.  I could certainly see why this was Chef's favorite dish.  The collarbone was so full of flavor, it was an absolute treat to eat.

Our fourth dish was a black cod ceasar salad topped with deep fried anchovies and croutons.  The anchovies and croutons gave the salad a nice crunch and the cod was perfectly prepared.

Our fifth course featured the Atlantic Day Boat scallops that were were so excited to try.  They were placed on a butternut squash puree.  I was starting to get full, but made sure to eat every bite of this dish!

Our last savory course was a head-on prawn with Blue Shell mussels and a fish fillet (that I don't recall) with a wine reduction.  By this time I was extremely full, so I didn't mind letting Kevin finish my dish.

While waiting for our dessert course, we were brought a small kettle of hot apple cider as a palate cleanser.   It was paired with a tiny piece of gingerbread cake.  Kevin also enjoyed a shot of espresso. 


Here is a picture of our dessert course!  On the left is a Key Lime pie with blueberries.  In the middle is a chocolate cake with raspberries and on the right was our favorite-- a mix between banana pudding and creme brulee served in an espresso cup and topped with vanilla bean ice cream!

It was the perfect end to a perfect evening.  I highly suggest BlackSalt for any occasion! 


Friday, November 16, 2012

Wine Tasting Tour in Virginia


Last weekend my friend Becca had the amazing idea to do a wine tasting tour in Virginia!  It was something that Kevin and I have always wanted to do and we were so glad that Becca organized the Sunday Funday outing.  Going wine tasting is so much better than watching NFL Redzone all day on Sundays, right Kevin?

We started out the day at Barrel Oak Winery with a little wine tasting in their gorgeous tasting room.  Barrel Oak has an indoor tasting room with two downstairs wine tasting bar tops and one upstairs location.  They also have one outdoor wine tasting bar.


 Downstairs in the Barrel Oak tasting room


The greatest thing about Barrel Oak Winery to me was that it is extremely dog friendly!  There is nothing worse than bringing a dog lover who can't have her own dog (my apartment doesn't allow them) to a winery FULL of puppies and dogs!  I believe it was Paul who said, "It's like taking a diabetic to Willy Wonka's Chocolate Factory."

They also had tons of picnic tables outside on the grounds where we had an impromptu picnic with the snacks that everyone brought and the wine we bought after the wine tasting.


 Picnic time!


 It's never too early for wine..


 Yes, I had to pet this adorable puppy...


 Sunday Funday!


After a wine tasting and a couple bottles of wine we headed to our next winery, Vintage Ridge, which was just a couple of miles down the road.  This winery was much smaller, so Becca made sure to make reservations for our group the day before. 

I really enjoyed the wine at this winery and also suggest trying their spicy pecans.  On certain days they also have special tastings where they pair their wine with small plates.  The tasting room is small, but very warm and inviting.  I liked how they do wine tastings at tables as well as at the bar, which was great because our large group was able to sit together at a table rather than standing along the bar.


Our group at the wine tasting table


Outside at Vintage Ridge


 Really great outdoor seating


 Paul-  "Can someone please pass me the tiny ver- dot?"


 Good times!


Wednesday, October 24, 2012

DIY Wedding Projects: Wedding Isle Vases


My Pinterest Project Inspiration:


With my wedding only four months away, it's time for the DIY projects to commence!  I will be having a very small and intimate beach wedding ceremony this upcoming February.  Since the ocean naturally provides a beautiful backdrop for my wedding ceremony, there is not a lot to do by way of ceremony decorations other than my bamboo canopy with custom floral arrangements.  However, I did come across this idea on Pinterest and thought that it will add a little spice to my isle seats!  

First, I bought some mason jars online.  A case of twelve was under $10.  Then I went to my favorite craft store, Hobby Lobby, to pick up some hemp twine and wire.  The project was very easy to do and only took a few minutes.  I began by creating loops with the wire on the sides of the mason jar.  I twisted a little loop on each side and connected the wire in the middle of the rim.  


Close-up of the loops


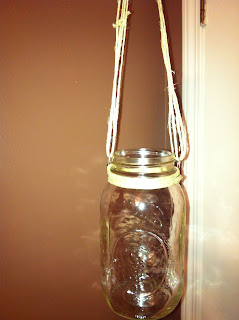
Then I wrapped some twine around the rim of the mason jar and tied it off on the end.  From there, I measured out enough twine to hang from the isle seats, and strung it through the wire loops.  Then I tied it at the top.  Super easy! 


Measuring the twine


The finished product.  I can't wait to see how they look with flowers!


Stay tuned for more wedding DIY projects and a photo recap from my upcoming wedding and reception.